

DIY Padded Eyepiece Carrying Case
Eyepieces, cameras and various astronomical accessories are usually fragile and expensive items. The problem is that transporting numerous accessories, while trying to keep them intact, can become quite a troublesome task. Especially if you keep them in a hard box and have to individually pack each item. I found out that by having all my eyepieces and accessores stored in a hard case with foam, fully padded individuall cells - I'm able to fully assemble my 10" equatorial telescope setup in about 15 minutes. Also I never forget anything, since an empty cell will always draw my attention.
In terms of safety this packing method is the best option available, that is why so many manufacturers use it. Due to the thick layer of foam which wraps each item and dumpens any impacts - It can easily withstand a 1 meter drop without compromising the safety of your precious equipment. I've seen a 4" Takahashi refractor in a foam padded aluminium box dropped onto a solid rock - no damage was caused to the OTA, even the collimation remained intact.
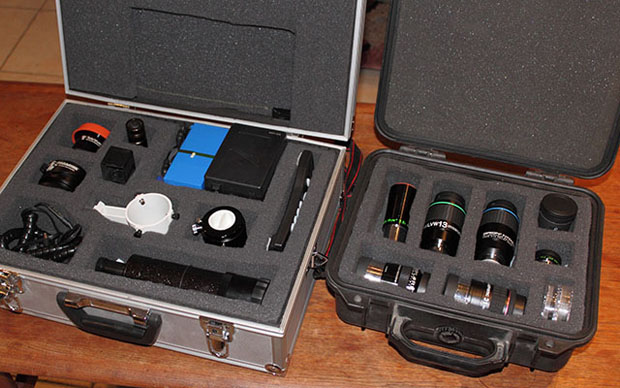
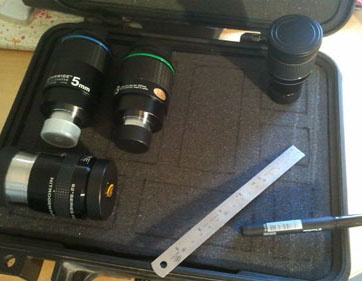
Examples of home-made eyepiece and equipment carrying cases
The Case
There are a few types of hard cases:
- Hard plastic "military" cases, such as the ones made by Pelican (top right picture). They are ridiculously expensive, extremely tough and waterproof. If you have a really expensive set of equipment - you might consider getting one.
- Aluminium cases, such as the ones used for audio equipment (top left picture). They are much cheaper and easier to come by. In my opinion such case offers more then enough protection, unless you plan tossing your equipment into a lake or run it over with a car.
- Plastic "toolbox" cases. These are quite cheap but are much less convenient for foam padding due to their form factor and the lack of space for foam in their cover.
The case size is another consideration. In terms of time, price and volume utilization - a large and relatively flat case would be the best option. However I found out that it is easier to pack three small cases into a fully stuffed car rather then one, big box.
The Foam
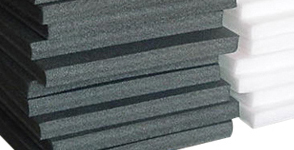
Hard polyethylene foam - best for heavy and bulky equipment (such as EQ6 mount head)
If you are making case for a heavy piece of equipment, such as an equatorial mount head, you should really use a hard polyethylene foam rather then a regular soft foam.
However for eyepieces and cameras - I would really recommend the soft, packaging grade "gray" foam. In case of an accidental drop it will dumpen the shock much better, reducing the chances of optical elements shifting and loosing alignment.
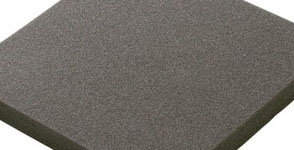
Soft "gray" foam - best for fragile equipment (such as eyepieces or a camera lens)
For all of my cases I simply bought two 1x2m sheets (2 and 4 cm thick) from a store which specializes in packaging.
Some of the cases often come with "peel it yourself" type of foam, which in my opinion isn't all that convenient. It isn't durable and also requires you to make really thick walls between the sections, which reduces the amount of items you can pack. Using a regular packaging grade "gray" foam with cutouts will allow you to pack much more equipment without compromising the safety and durability. It is also cheaper and looks better. For the case cover you might consider using an "eggshell" gray foam.
The Padding
The method is to insert 3 layers of foam into your case. The bottom and the top layers should be quite thin (I used 2cm sheets of foam) and the middle insert is the thick layer which will be cut and form the inner walls. Its thickness should be according to the case height, so when it is fully closed there will be no air left inside, only foam. You may use 2 or more middle layers in case the case is really big. This is the illustration of the padding method:
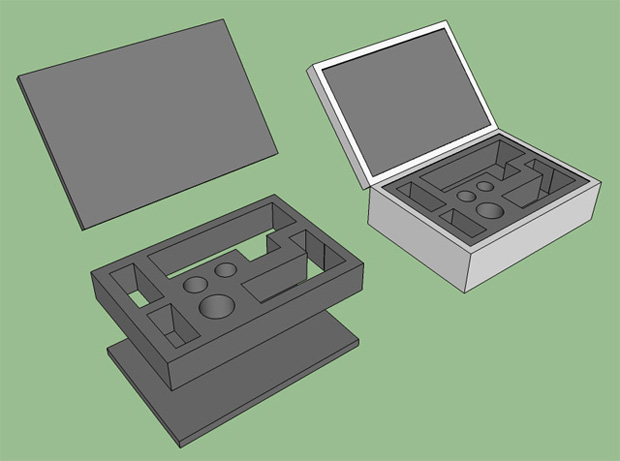
Method of making the foam inserts for the case
After you cut the required foam rectangles and put them inside - you should plan the individual cutouts for each piece of your equipment (this was a task I actually enjoyed doing).
Planning the cutouts
Place the eyepieces on top of the middle foam layer, position them in a way you would like them to be stored, and draw an outline around them. Make sure that the outlined cell will be able to accommodate the widest parts, and keep the spaces between each section (walls) thick enough - I recommend at least 2 cm. You can be creative with shapes, however making simple rectangular cutouts it is much easier and it is also less specific (in case you wish to store a different item in the same cell).
To make the actual cuts you can use a sharp long thin knife, like I did. However with a knife your cutouts won't look quite clean. If you want to achieve a more "factory like" result you may consider purchasing an electric kitchen knife - Phillips makes one for example.
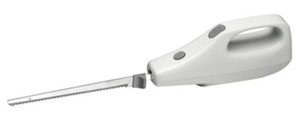
A Phillips electric kitchen knife is an effective tool for cutting the foam inserts
At the end, when everything is done, you should glue the foam layers using a few streaks of simple contact glue. The top layer is glued to the case cover, the bottom layer to the case bottom, and the middle layer is glued to the bottom layer.